Working with agents
Agent nodes enable a different way of building workflows in OPAQUE. Instead of defining a fixed sequence of steps, you define a goal and give an agent access to the capabilities it needs to reach that goal at runtime.
This guide assumes you’ve completed the Get started guide and are familiar with creating and launching workflows. It covers how agentic workflows are structured, how to design and configure them effectively, and how to validate agent behavior before launch.
How agents reason
An Agent node doesn’t execute as a single, one-off step. Instead, it runs a controlled reasoning loop: it evaluates its goal and the current input, decides whether it has enough information to respond, and may invoke one or more tools before producing a final result.
At a high level, the loop works like this:
- The agent receives its goal, the incoming prompt, and a list of available tools.
- It evaluates whether it already has enough information to produce a response.
- If not, it selects an appropriate tool and supplies structured inputs.
- The tool returns structured output.
- The agent reassesses its goal in light of the new information.
- This continues until the agent determines it can produce a final result.
The agent isn’t autonomous in an open-ended sense. It can only act within the tools you explicitly connect, the descriptions you provide for those tools, and the constraints of the workflow itself. This is why agentic workflows are designed around capabilities rather than a hard-coded sequence of steps—and why tool descriptions and observability matter when things don't behave as expected.
Building blocks of an agentic workflow
Every agentic workflow uses the same building blocks: an Agent node, a language model that powers it, and one or more tools it can invoke.
The Agent node
The Agent node is the decision-making core of the workflow. It reasons about a goal, evaluates context, and decides what to do next. Unlike standard nodes, which perform a single fixed operation, the Agent node may:
- Call one or more tools
- Skip tool calls and respond directly
- Combine multiple tool results into a single response
The Agent node itself does’t store data or retrieve information. It coordinates other nodes to achieve its goal.
A language model
The agent’s reasoning is powered by a language model connected to the Agent node. The model determines how the agent interprets its goal, understands tool descriptions, and produces responses.
Model choice doesn’t define workflow behavior on its own—the agent goal and tool descriptions do that—but it can affect how reliably the agent follows instructions and uses available tools.
Tools
Tools are how agents access data and take actions beyond pure reasoning. In OPAQUE, tools are nodes configured in Tool mode and connected to the Agent’s Tools handle. They’re not part of the main Start → End execution path. Instead, they’re registered with the workflow and made available to the agent, which decides whether, when, and how to invoke them.
Available tool types include:
- Data connectors (for example, Azure AI Search or PostgreSQL)
- MCP-based tools for calling external services
Some tools are built-in connectors; others are defined via MCP when you need to call external APIs.
Using the MCP Tool
Use the MCP Tool when an agent needs to interact with external systems or APIs that go beyond built-in connectors. The MCP Tool is configuration-only—it has no input or output ports of its own. It defines what a tool does, how it’s called, and what it returns, so the agent can decide when to use it. See Working with nodes and Configuring nodes for details.
Designing an agentic workflow
Building an effective agentic workflow starts with clear separation of responsibilities: the agent decides what to do, and tools provide the data and actions it needs. The following steps walk through the design process.
Step 1. Place and connect the nodes
At a minimum, an agentic workflow requires:
- An Agent node
- A tool-enabled LLM node connected to the Agent’s Model handle
- One or more tool-enabled nodes connected to the Agent’s Tools handle
You still connect Start → Agent → End to define the workflow’s entry and exit points. The difference from a standard workflow is that data access and actions happen through the agent's tool calls rather than a fixed node sequence.
The following example shows a simple agentic workflow—an HR assistant that answers questions about leave balances, claims, and employee directory information. It consists of:
- An Agent node (
hr_assistant_agent) - A model (
OpenAI Service Integration) - Three tools:
- Two PostgreSQL connectors (
claims_tool,leave_balance_tool) - An MCP-based employee directory tool (
employee_info_tool)
- Two PostgreSQL connectors (
This structure gives the agent everything it needs to retrieve the right data and respond without hard-coding a fixed sequence of checks.
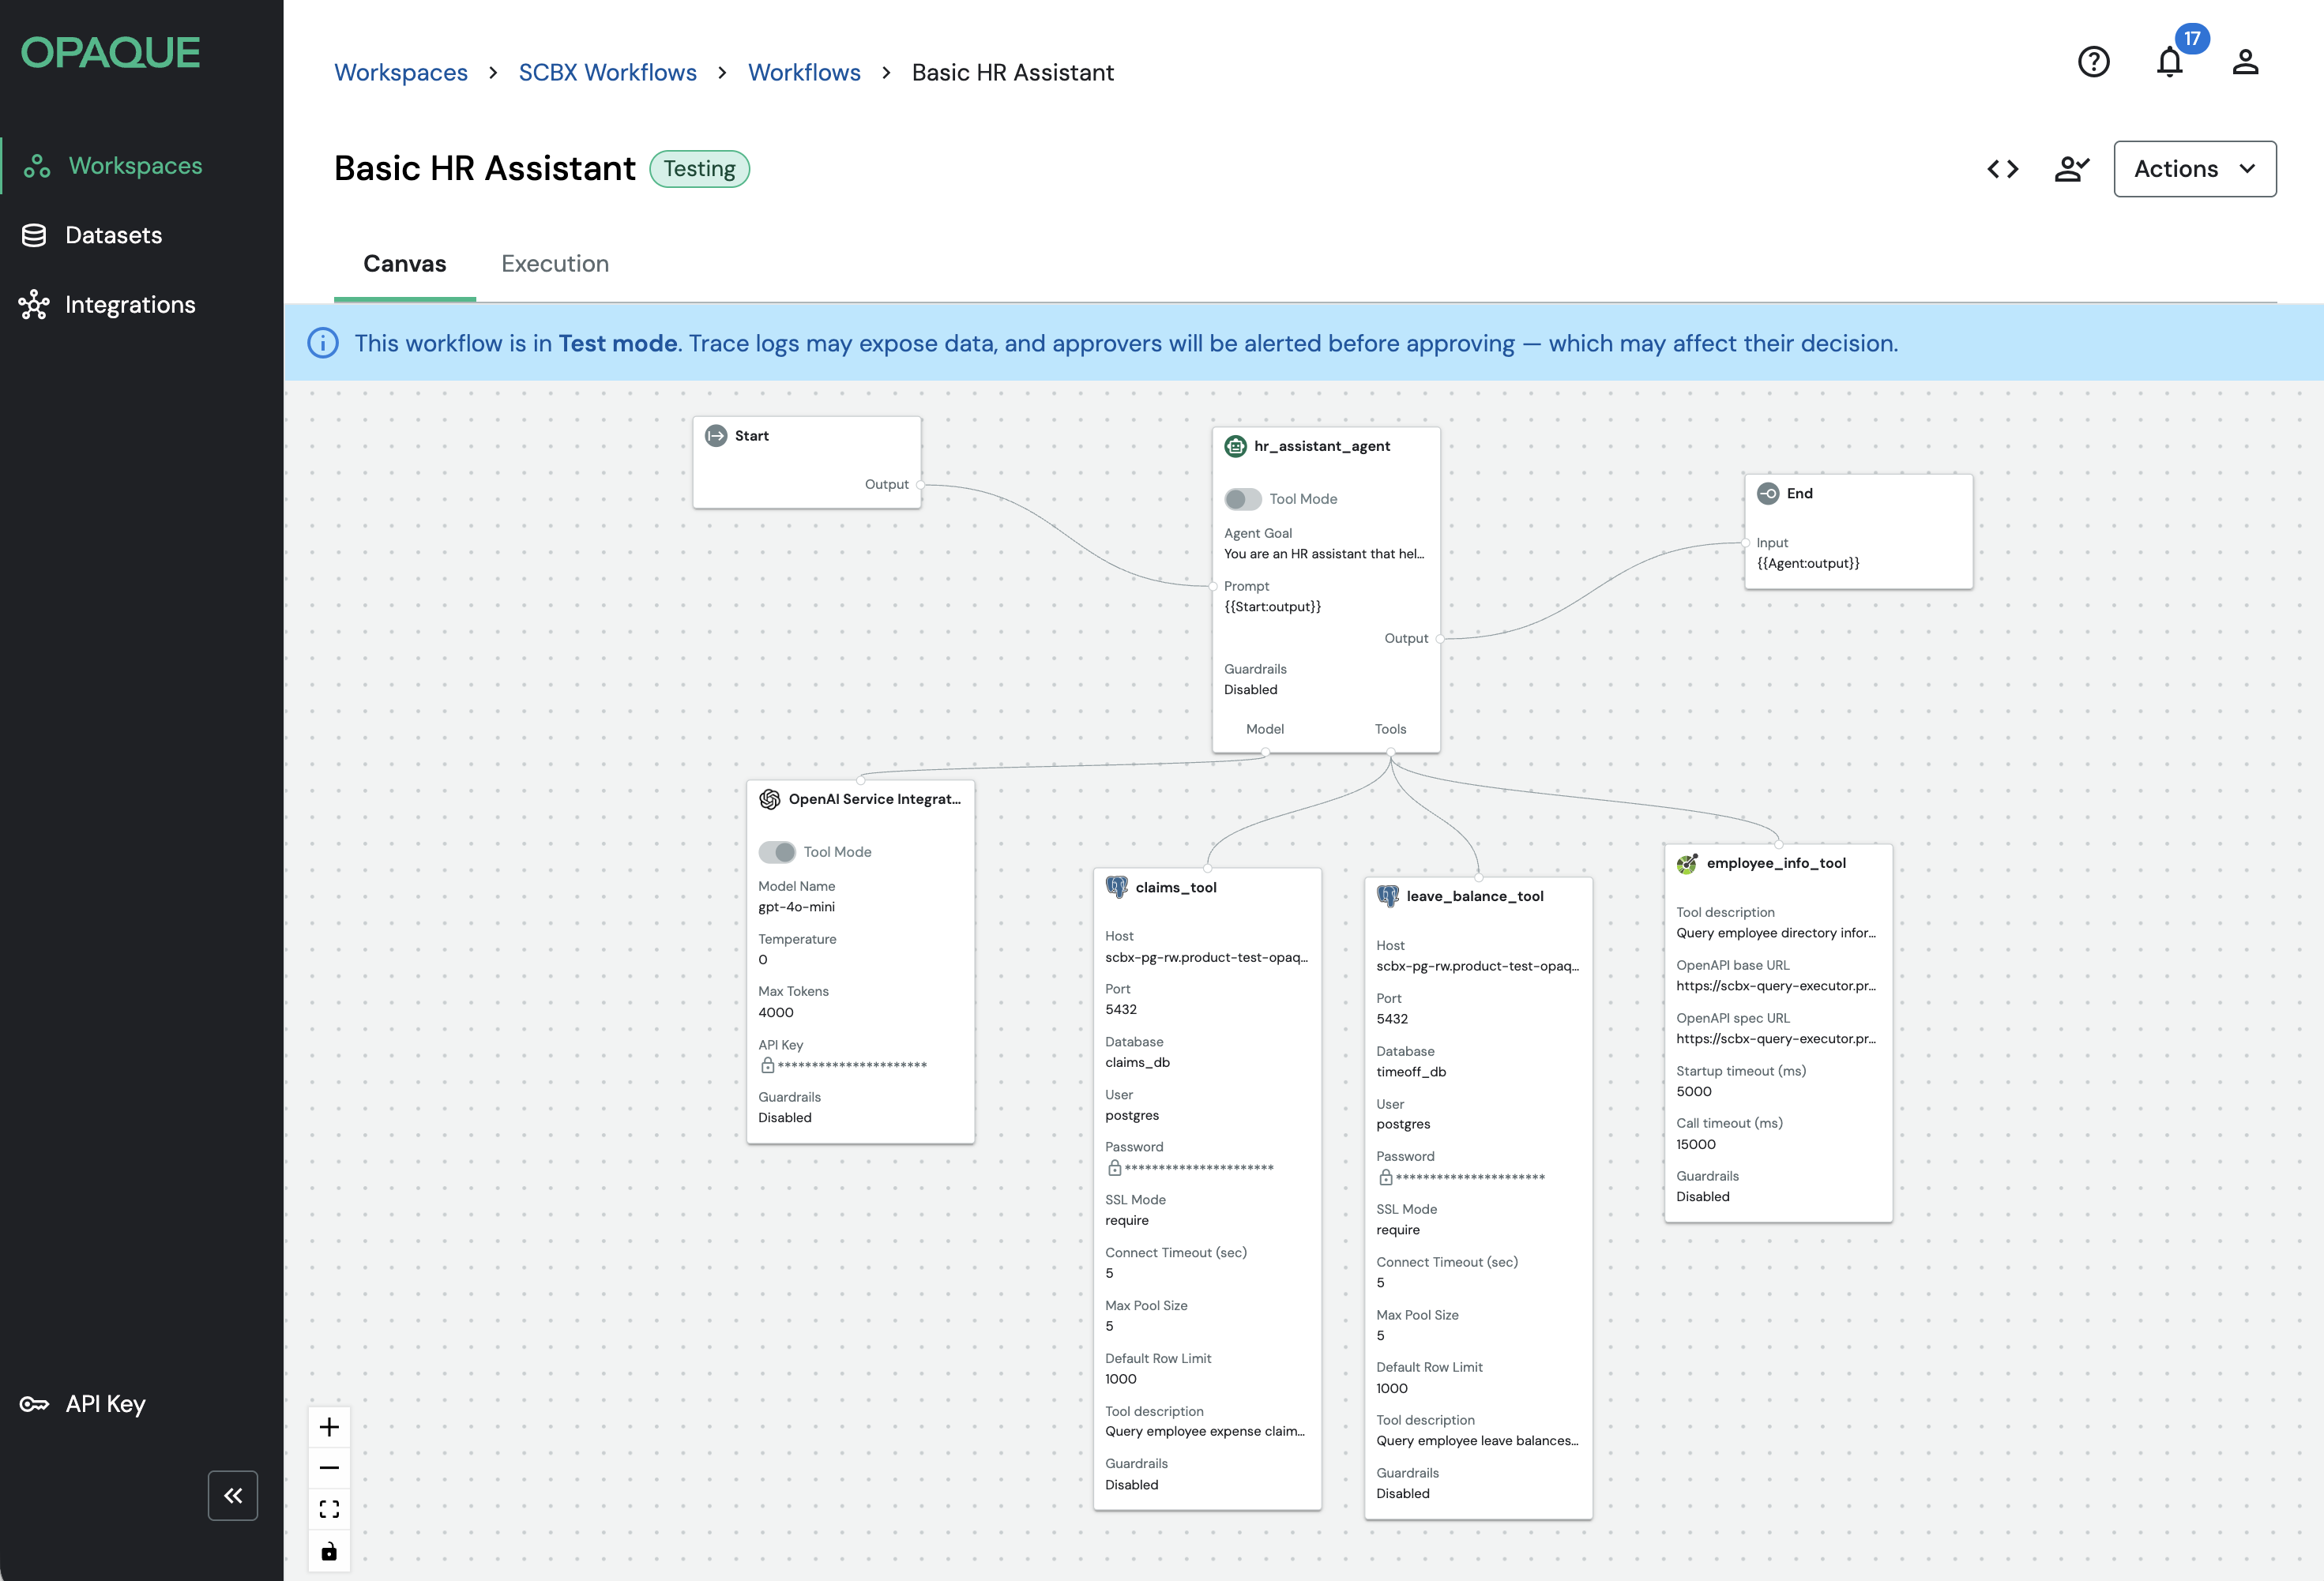
Example of an agentic workflow with an HR assistant agent.
Step 2. Define a clear agent goal
The agent goal is the most important part of configuration. It frames how the agent reasons and remains stable across executions. Think of it as the agent’s role description combined with any reusable procedures you want it to follow consistently.
A good agent goal:
- Describes what the agent is responsible for—not how to do it step by step
- Is durable and high-level, not tied to a specific request
- Avoids embedding request-specific input
It’s often helpful to include standard procedures for repeatable tasks—for example, what a "departmental leave report" means and the format it should follow. Keep these procedures generic and rely on tools for live data.
The following example shows the goal for the HR assistant agent described above:
You are an HR assistant. Help employees with questions about leave balances, expense claims, and employee directory information.

For each request:
1. Identify which tool(s) can provide the needed data.
2. Use tools to fetch current information.
3. Respond using only the returned results.

Rules:
- If a request requires an employee record and employee_info_tool returns no match, stop and report that the employee was not found.
- If the request does not include an employee identifier (email or name) and one is required, ask for the missing information instead of guessing.

Standard outputs:
- “Departmental leave report” = a summary by department with:
  - department name
  - employee count included
  - vacation_leave_balance_approved totals (and/or averages, if requested)
  - sick_leave_balance_approved totals (and/or averages, if requested)
  - time window (ask if not provided; otherwise state what you assumed)
- When asked to “generate a report” and then analyze it, produce the report first, then clearly separate an “Analysis” section that references the report numbers.

Tools available:
- employee_info_tool (employee directory)
- leave_balance_tool (leave balances)
- claims_tool (expense claims)
Step 3. Write strong tool descriptions
Treat tool descriptions as part of the agent’s instructions. The agent decides which tools to call — and how to call them — based on what you write here. If the schema, constraints, or query rules aren't explicit, the agent will guess.
A strong tool description:
- Explains what the tool does and when to use it
- Specifies what data it can access (tables/collections, key fields)
- Describes what the output contains and how to interpret it
- Documents how to call it (required inputs, expected formats)
- Notes important constraints or assumptions (limits, filters, query rules)
The following example shows the description for the leave_balance_tool in the HR assistant workflow:
Query employee leave balances from the PostgreSQL database.

Table: timeoff

Columns (exact names):
- email (text) — employee email
- emp_name_en (text) — employee name
- vacation_leave_balance_approved (text) — vacation days
- sick_leave_balance_approved (text) — sick days

Query rules:
- Use literal values in WHERE clauses (example: WHERE email = 'john.doe@scb.co.th').
- Do not use parameter placeholders (for example, :email).
And the claims_tool:
Query employee expense claims from the PostgreSQL database.

Table: claims

Columns (exact names):
- email_submitter (text) — employee email
- submitter_name (text) — employee name
- claim_type (text)
- claim_amount (text)
- status (text)

Query rules:
- Use literal values in WHERE clauses.
- Do not use parameter placeholders.
Tip
Tool descriptions are one of the most common failure points in agentic workflows. If the agent is calling the wrong tool, querying incorrectly, or producing unexpected results, the tool description is usually where to start. Investing time here typically pays off more than adjusting the agent goal or model settings.
Step 4. Test your workflow
Once the workflow is configured, use Test mode to validate agent behavior end-to-end before submitting for review. Because agentic workflows are non-deterministic—execution paths can vary run to run—testing is especially important here compared to standard workflows.
In particular, confirm:
- Which tools the agent calls, and in what order
- What inputs it sends to each tool
- How it uses returned data to produce its final response
- Whether tool descriptions are working as intended (for example, that the agent consistently picks the right tool and queries it correctly)
For step-by-step instructions, see Using test mode.
What's next
- Refine tool behavior: If the agent isn't using tools as expected, revisit your tool descriptions before adjusting the agent goal or model.
- Inspect execution traces: Test mode provides per-step visibility into agent decisions, tool inputs, and outputs. See Using test mode.
- Request attestation: For workflows running on sensitive data, attestation reports provide a cryptographic record of each execution. See Working with attestation reports.