Enable Okta SSO for Opaque
This guide walks you through integrating your Okta Identity Provider (IDP) with Opaque, which is backed by Auth0. This integration enables single sign-on (SSO), allowing users to access Opaque using their existing Okta credentials—eliminating the need for separate username and password management.
Before you begin
Before integrating with Opaque, ensure you have the following:
- Opaque callback URL and a global token revocation link (provided by Opaque).
- Okta account with administrator privileges.
- Access to create and configure applications in Okta.
- List of users who need administrative roles in Opaque.
- A secure email client to send sensitive details.
Integration overview
The following graphic captures the key steps involved in integrating Okta SSO with Opaque.

Integrating with Opaque
To integrate Okta with Opaque, you'll set up an OIDC web application in your Okta tenant, configure authentication settings, and assign users to an Opaque organization. In Opaque, organizations serve as top-level units for user management, with users assigned specific roles. If managing multiple organizations in Opaque, you’ll need to create a separate Okta app integration for each one.
Note
For a definition of an Opaque organization, see the Key terms section.
Step 1. Add and configure the Opaque web app in Okta
- Log in to your Okta Admin Console.
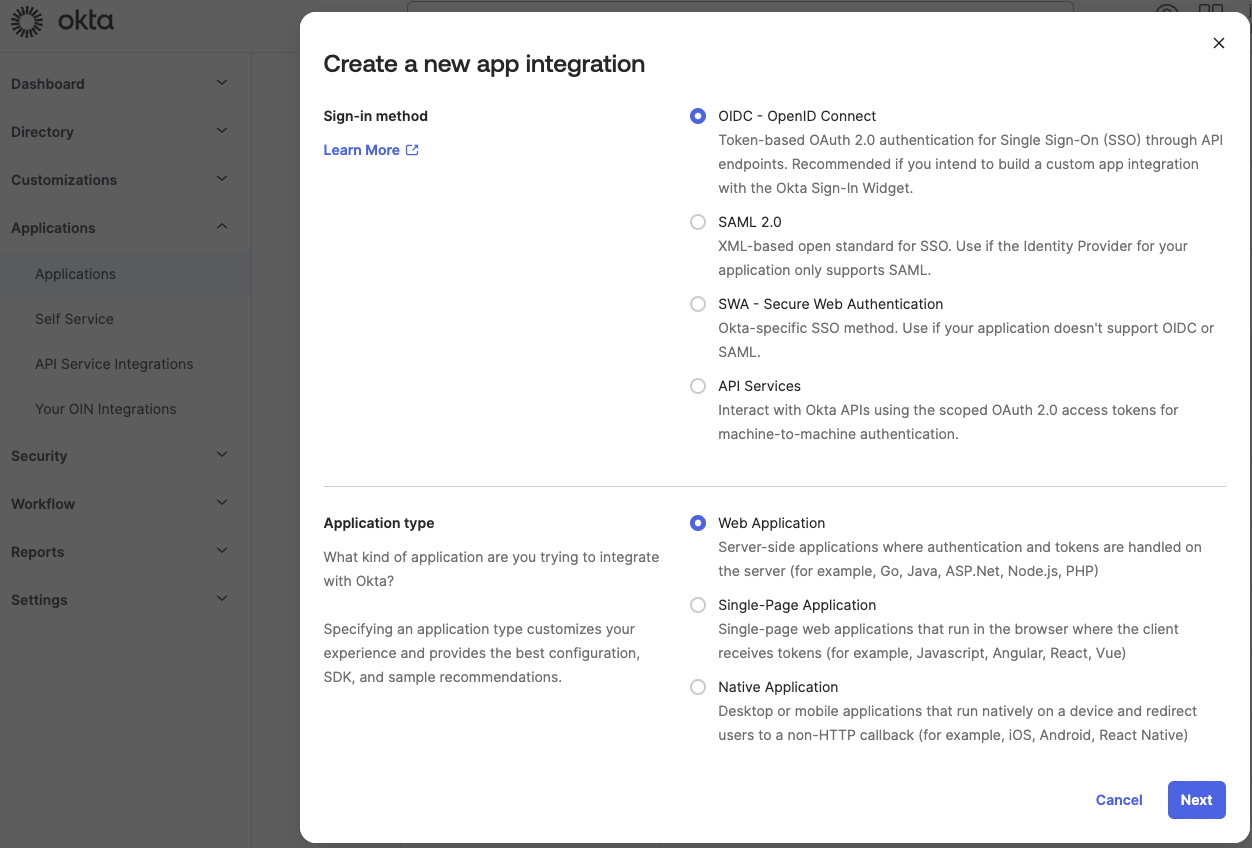
- Click Applications > Create App Integration.
- Select OIDC - OpenID Connect as the sign-in method and Web Application as the application type.
-
Click Next to configure the app settings.
-
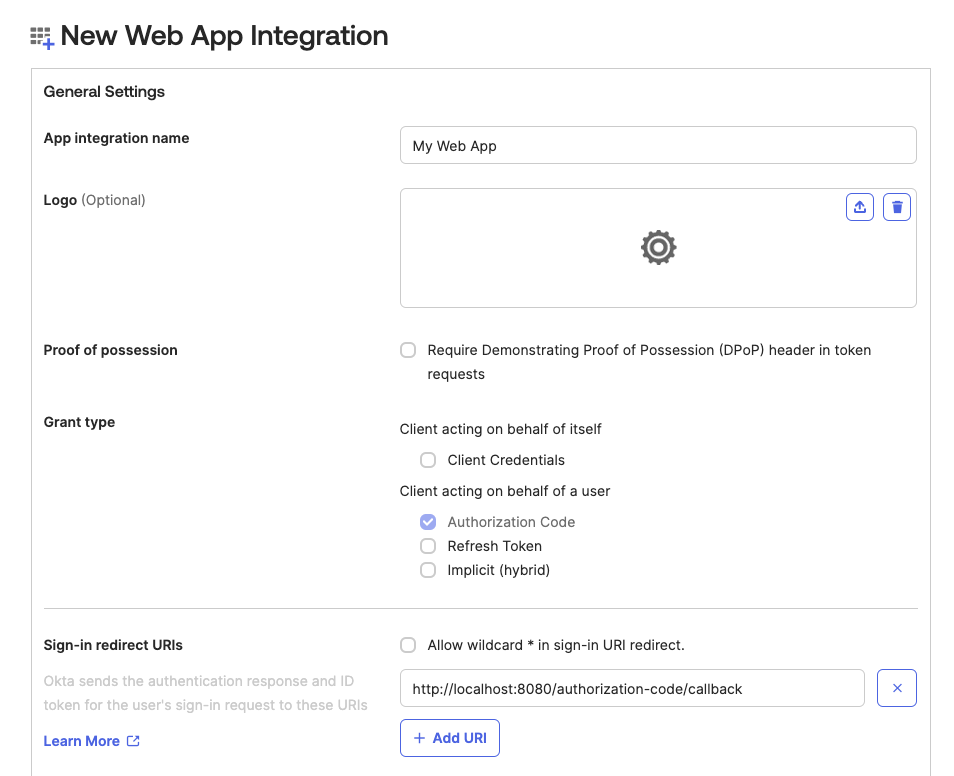
Enter an App integration name (e.g., Opaque SSO), and fill in the Sign-in redirect URI provided by Opaque. This is where Okta sends OAuth responses.
-
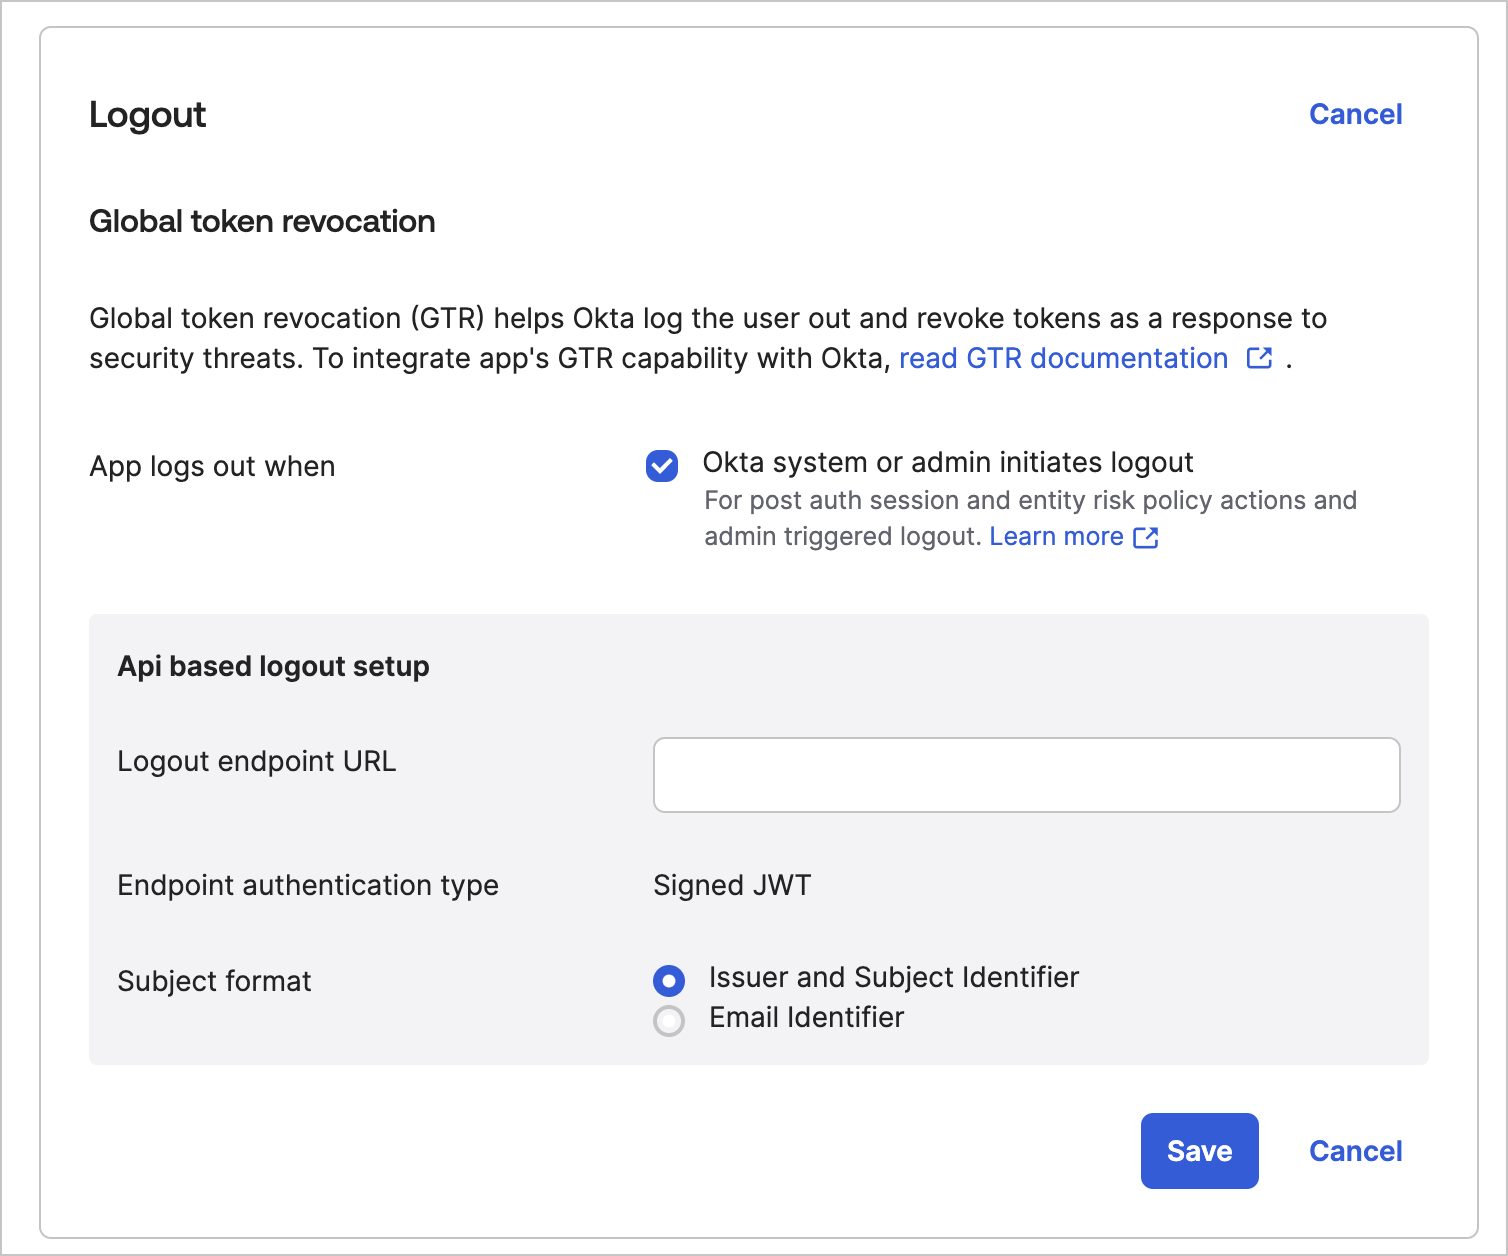
(Optional; Okta Professional or Enterprise plans only) Enable Universal Logout to keep sessions in sync between Okta and Opaque.
Note
With Universal Logout enabled, signing out of Okta or deactivating an account logs the user out of Opaque within 10 minutes (the access token's TTL). Learn more about Universal Logout.
To enable:
- Use the global token revocation URL from Opaque.
- Add it to the Logout endpoint URL field in your Okta app settings.
- Click Save.
-
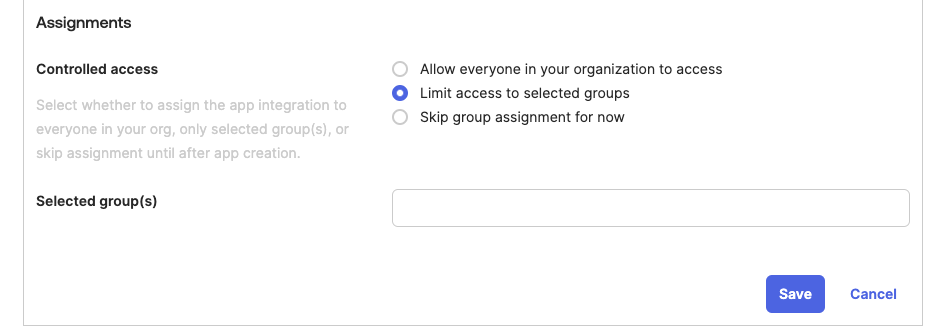
Configure Controlled access settings to define which groups of users can access the Opaque application.
-
Click Save to finalize the app integration.
Step 2. Share your app details with Opaque
Opaque uses Auth0 as an authentication broker to facilitate SSO between Okta and the Opaque platform. In order to integrate Okta with Auth0, you’ll need to send Opaque the Client ID and encrypted Client Secret of your new Okta app.
Retrieve your Okta application details
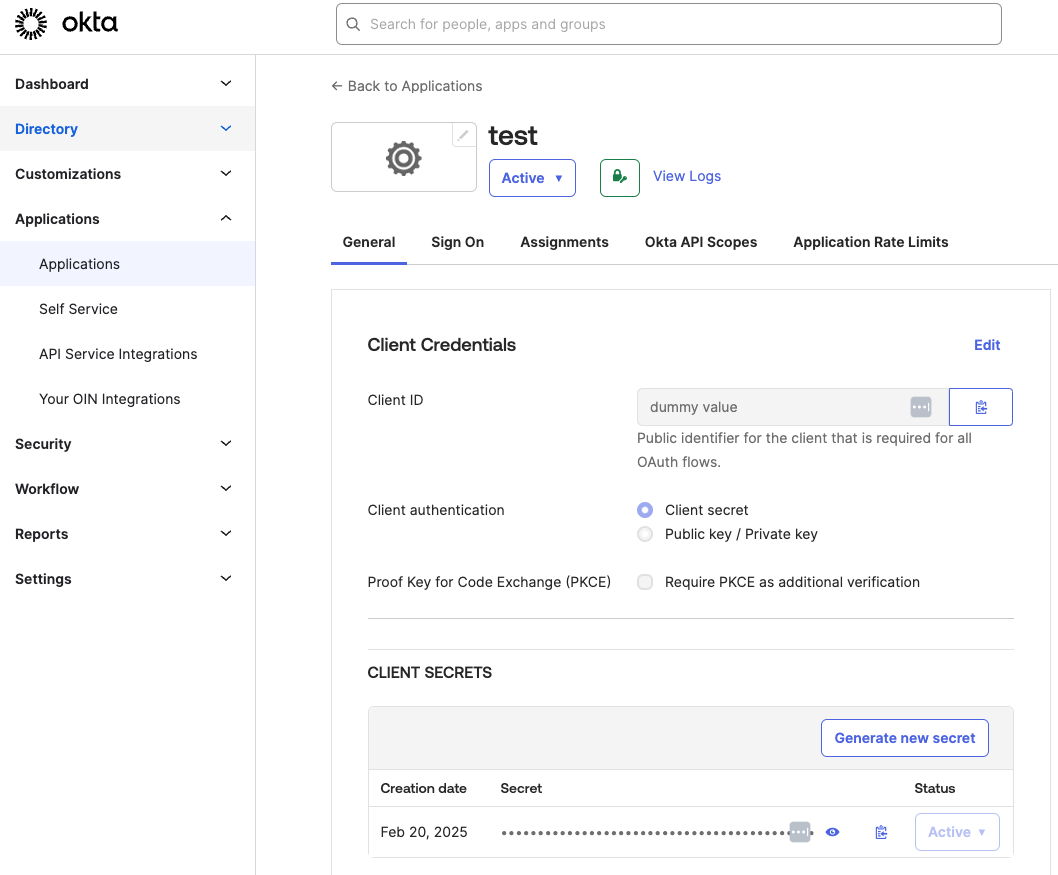
- In Okta, navigate to Applications and select your newly created Opaque app.
-
Locate and copy the Client ID and Client Secret—you’ll need these for encryption.
Encrypt the Okta client secret
For security, encrypt your client secret before sending it to Opaque. You can use any command line interface (CLI) or graphical user interface (GUI) encryption tools, depending on your preference.
For example, to use the GPG CLI:
-
Install GPG.
- macOS:
brew install gpg - Linux:
sudo apt update && sudo apt install gpg - Windows: Use Gpg4win to install GPG.
Note
Windows users: To use GPG in PowerShell, install GnuPG, then add its binary directory to your system’s PATH to ensure
gpgcommands are recognized. - macOS:
-
Encrypt and save your client secret.
-
Import Opaque’s public key (sent via email):
-
Verify the key was imported (the UID will be in the “pub” row):
-
Encrypt your client secret and UID:
The expected output is a PGP message similar to this:
-
Save the encrypted message to a file and email it to Opaque, together with your Okta application details (see next section).
-
Note
If you prefer a GUI, use one of the following tools:
- Kleopatra (Windows, Mac, Linux), a GUI for GPG encryption using Opaque’s public key:
- AxCrypt (Windows, Mac): Right-click any file to encrypt it using AES-256 encryption.
- Download AxCrypt.
- Cryptomator (Windows, Mac, Linux): Drag and drop files without creating full encrypted containers.
- Download Cryptomator.
Send Okta application details to Opaque
To configure Auth0 and set up your Opaque organization, Opaque needs your Okta application details. Email your Opaque contact with the following information:
- Okta domain (e.g.,
https://<your-okta-domain>.okta.com) - Email provider domain of your Okta accounts (e.g.
@opaque.co) - Okta client ID
- Encrypted client secret (attached as a file)
Opaque will notify you when the setup is complete, usually within one business day.
Note
If you need to set up multiple organizations within your Opaque app, you must create separate Okta applications for each organization and send the corresponding Okta details to Opaque. Opaque will configure Auth0 for each Okta application separately.
Step 3. Assign users to the app
Managing users through Okta groups simplifies administration, especially for large teams. You can create groups based on organizational divisions and assign them to Opaque. This guide shows you how to create a new group whose assigned users will have exclusive access to Opaque.
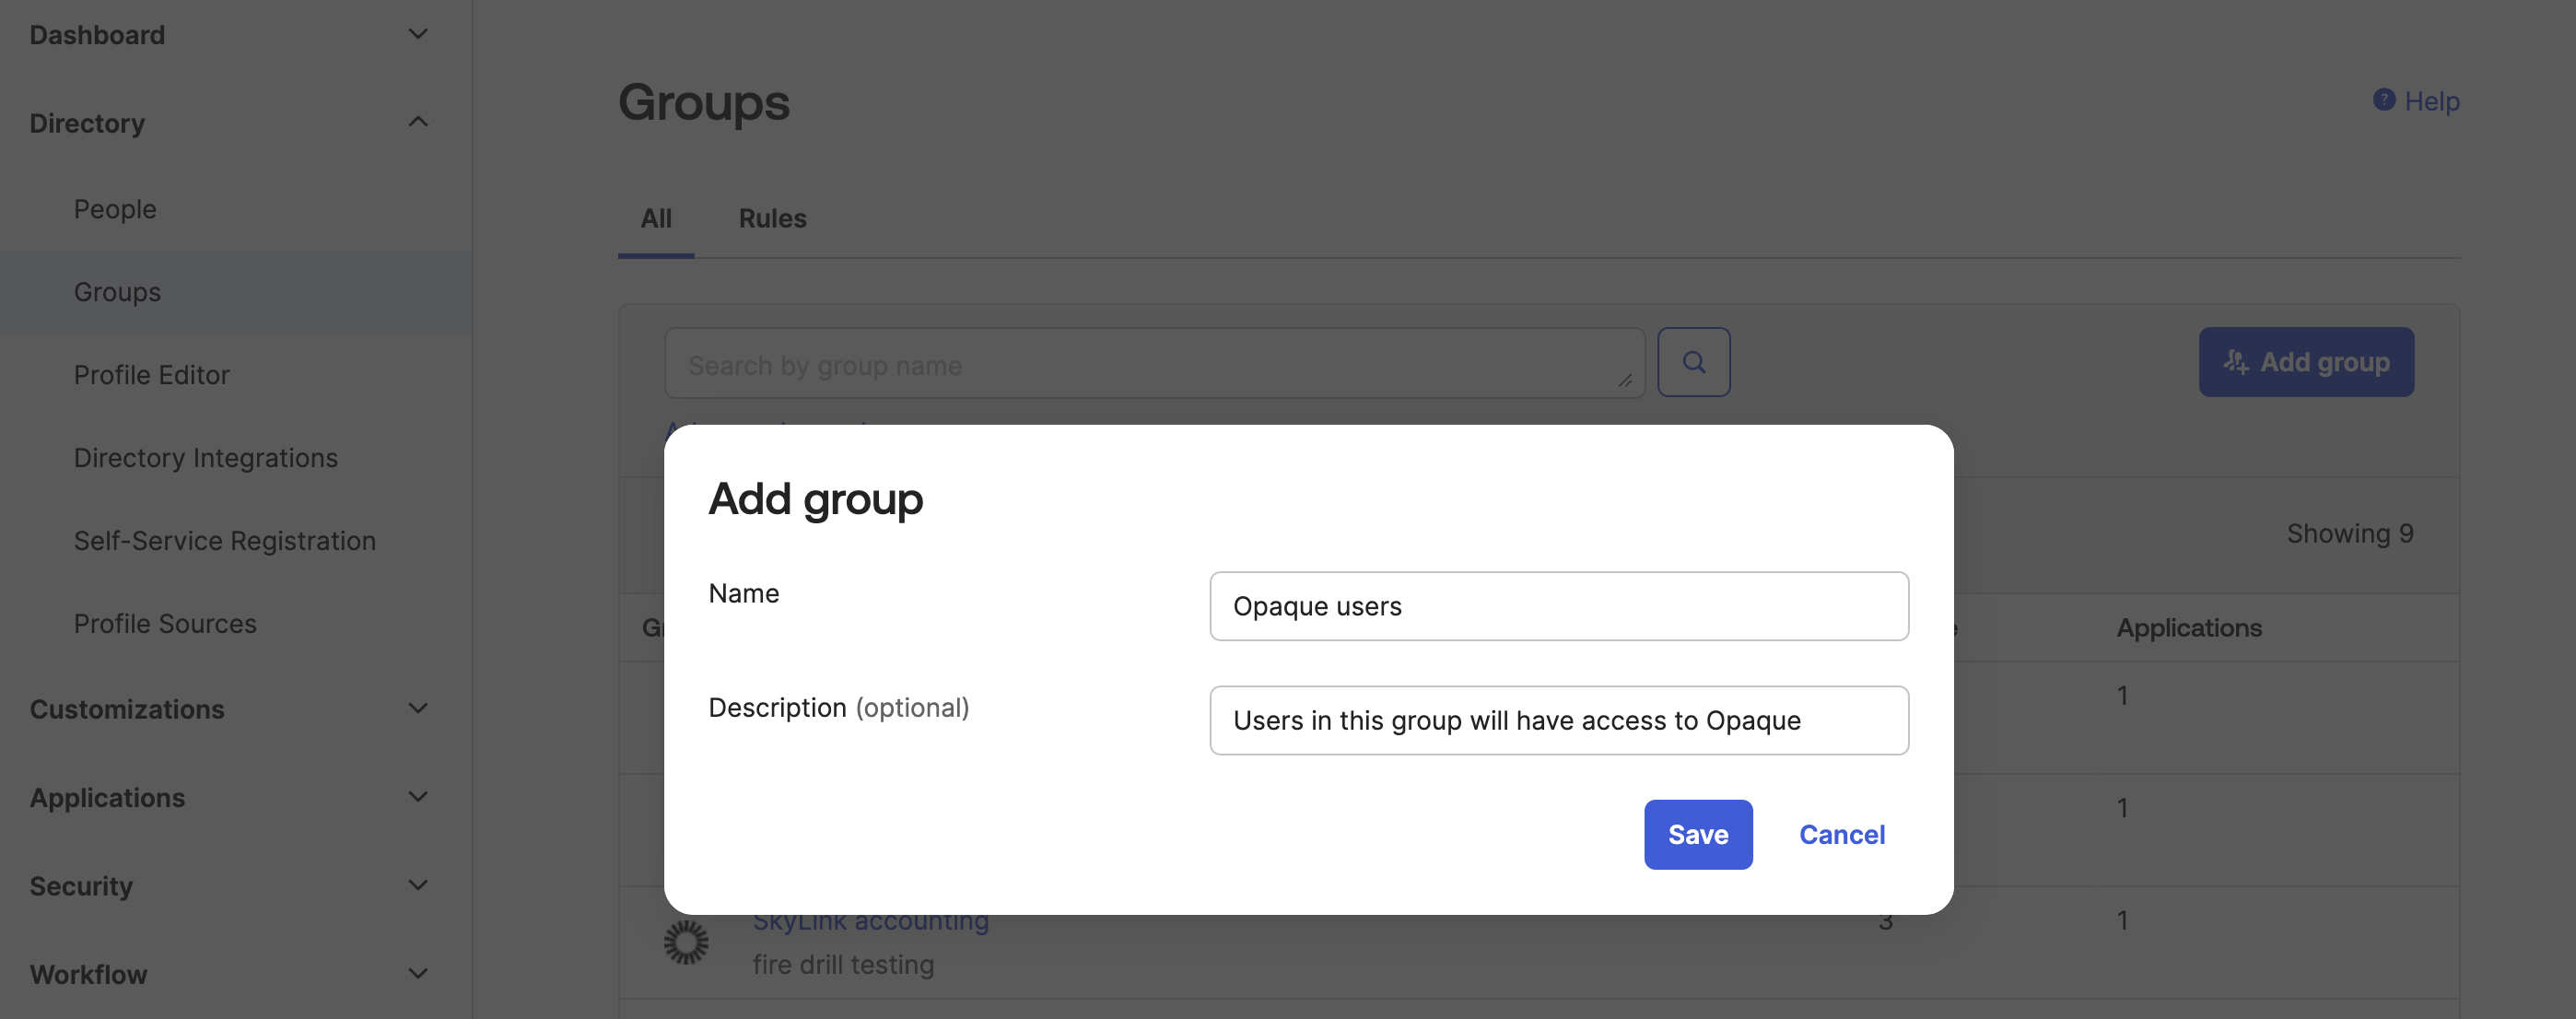
- In your Okta tenant, go to Directory → Groups and click Add group.
-
Add a group name (e.g., Opaque users), an optional description, and click Save.
-
Select the newly created group, then click Assign people.
- Click the + icon next to the users you want to add to this group. By default, they will be added as users without admin privileges.
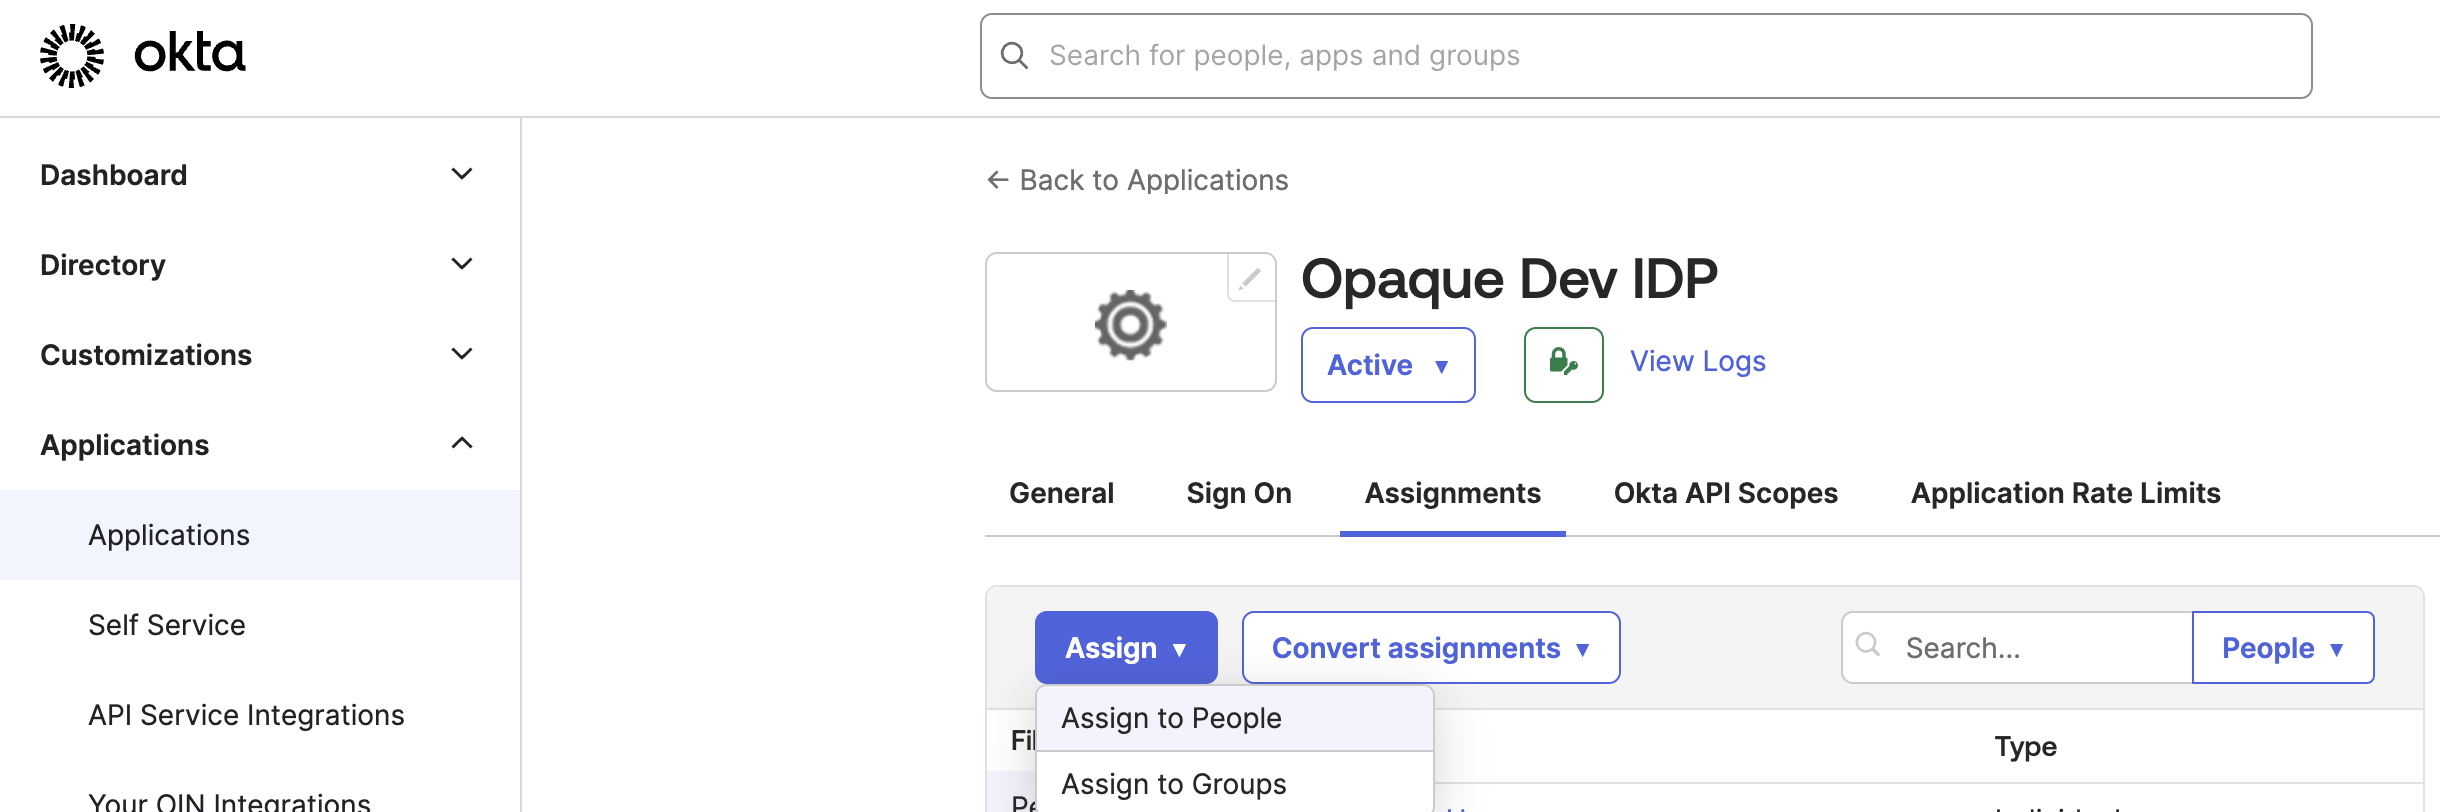
- Navigate to Applications → Your Opaque App.
-
Click Assign, and choose Assign to Groups.
-
Add your designated group of Opaque users to the app and click Done.
Step 4. Test and validate the integration
Before you can fully test and validate your integration, Opaque must add your designated administrator(s) to your Opaque organization.
- Assign an organization admin. You need at least one admin who will manage your Opaque organization and users.
-
Have the admin(s) sign in to Opaque.
Note
Upon first sign-in, your designated org admin(s) will be treated as regular Opaque users without admin privileges.
-
After they’ve logged in, send the following details to your Opaque contact:
- Admin name and email.
- Confirmation that they’ve successfully signed in.
Once confirmed, Opaque will assign admin privileges, enabling them to manage your Opaque organization and users.
Verify user roles
To ensure Okta authentication is working correctly, ask two users—one with admin privileges and one without—to sign in to Opaque.
-
Confirm successful authentication: Ensure users are redirected through Okta SSO and logged in to Opaque.
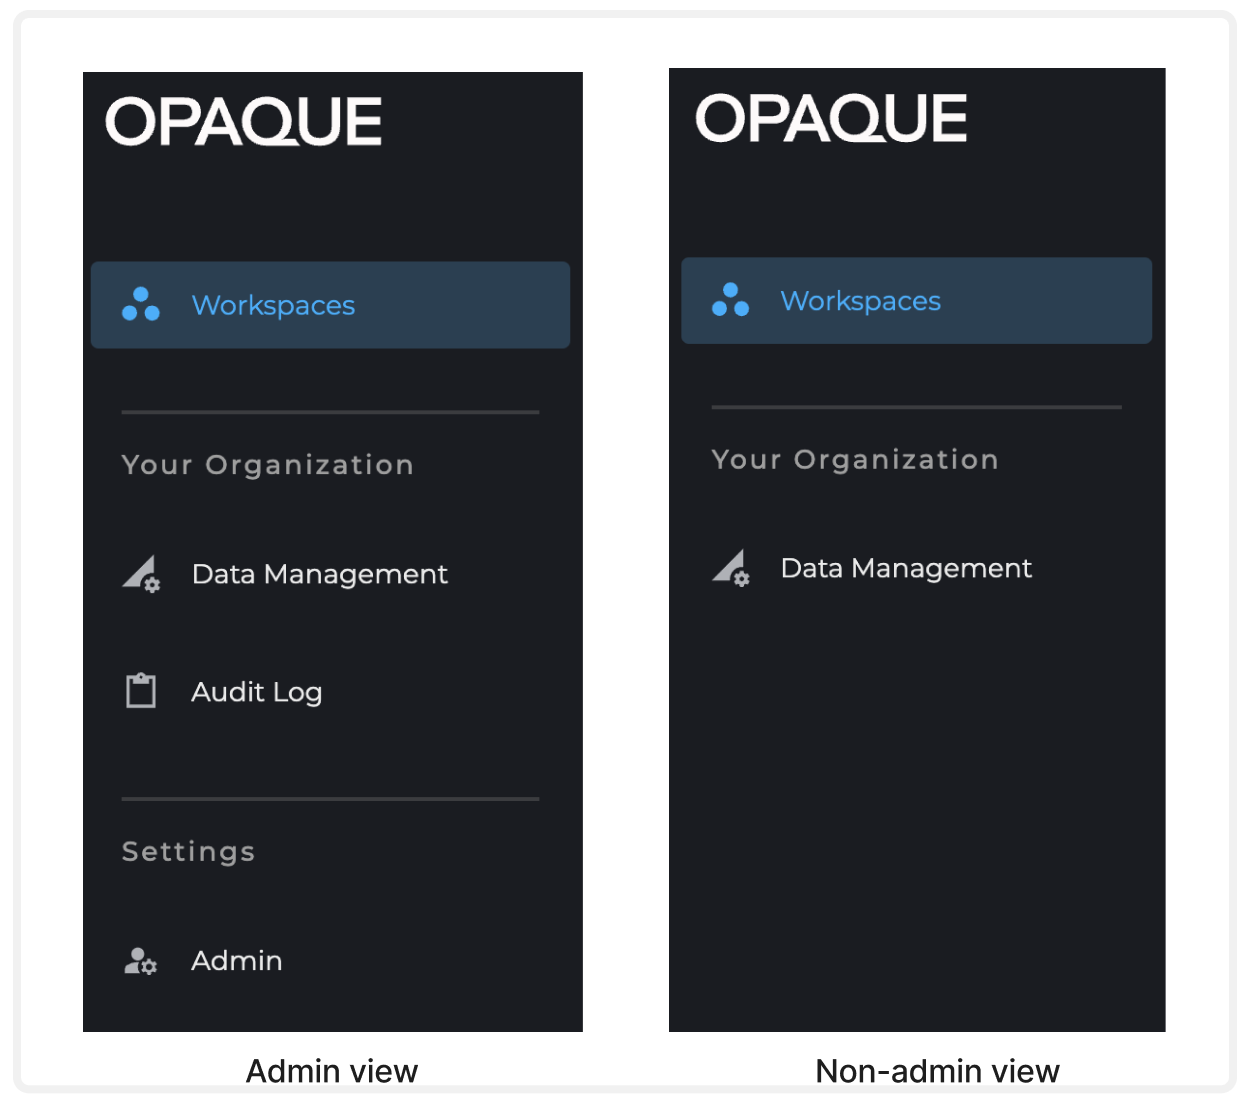
- Admins should see Audit Log and Admin in the left-hand navigation bar after signing in.
- Non-admin users should not see these navigation items.
-
Validate admin permissions: Confirm that your org admin can manage users via the Admin settings. (See Managing users for details.)
Note
For more details on user roles and permissions, see the Opaque documentation.
Sign-in issues? Refer to the following troubleshooting table for common sign-in problems and solutions.
Troubleshooting sign-in issues
| Issue | Possible Cause | Solution |
|---|---|---|
| User cannot log in | Incorrect email or password | Verify user has the correct email and password. |
| Okta credentials not working | User may not part of the organization in Opaque | Ensure the user is assgined to the Opaque Okta app. |
| No login page after clicking Log in to Opaque | Callback URL is not set properly | Verify that Sign-in redirect URIs is set correctly in the Opaque app. |
| Okta authentication page not showing | Okta connection might not be enabled Auth0 | Contact Opaque support to confirm that Okta authentication is enabled. |
Need help?
- For Okta-related questions:
- Refer to the Okta Help Center.
- For Opaque-related questions:
- Refer to the Opaque documentation.
- Contact Opaque support: [email protected].